Kitchen island pendants are the fixture I get the most questions about, and the one I see most often hung at the wrong height, spaced incorrectly, or sized in a way that creates an awkward proportion with the island. The rules aren't complicated once you know them. But I learned most of them the hard way, by buying the wrong size first, returning it, and buying the right size second.
Our kitchen island is 36 inches wide and 6 feet long, with white quartz countertops and white shaker cabinets. The kitchen itself has 9-foot ceilings. I'd been living with bare bulb sockets over the island for four months. The previous owners had removed the fixtures when they moved out. And I kept putting off the decision because I was afraid of getting it wrong. Turned out my fear was well-founded. I got it wrong on the first attempt anyway. Here's everything I learned.
How Many Pendants Over a Kitchen Island
The standard rule: one pendant per every 2 feet of island length, rounded down. For a 6-foot island, that's three pendants. For a 4-foot island, two. For anything under 3 feet, one large pendant or a linear fixture is usually the better choice.
I initially ordered two pendants. I thought three would look too busy over our island. I hung the two at 30-inch spacing, stepped back, and immediately saw the problem: two pendants centered over a 6-foot island look like a mistake, like one is missing. The asymmetry with the long island reads as unintentional. I returned them the next day and ordered three.
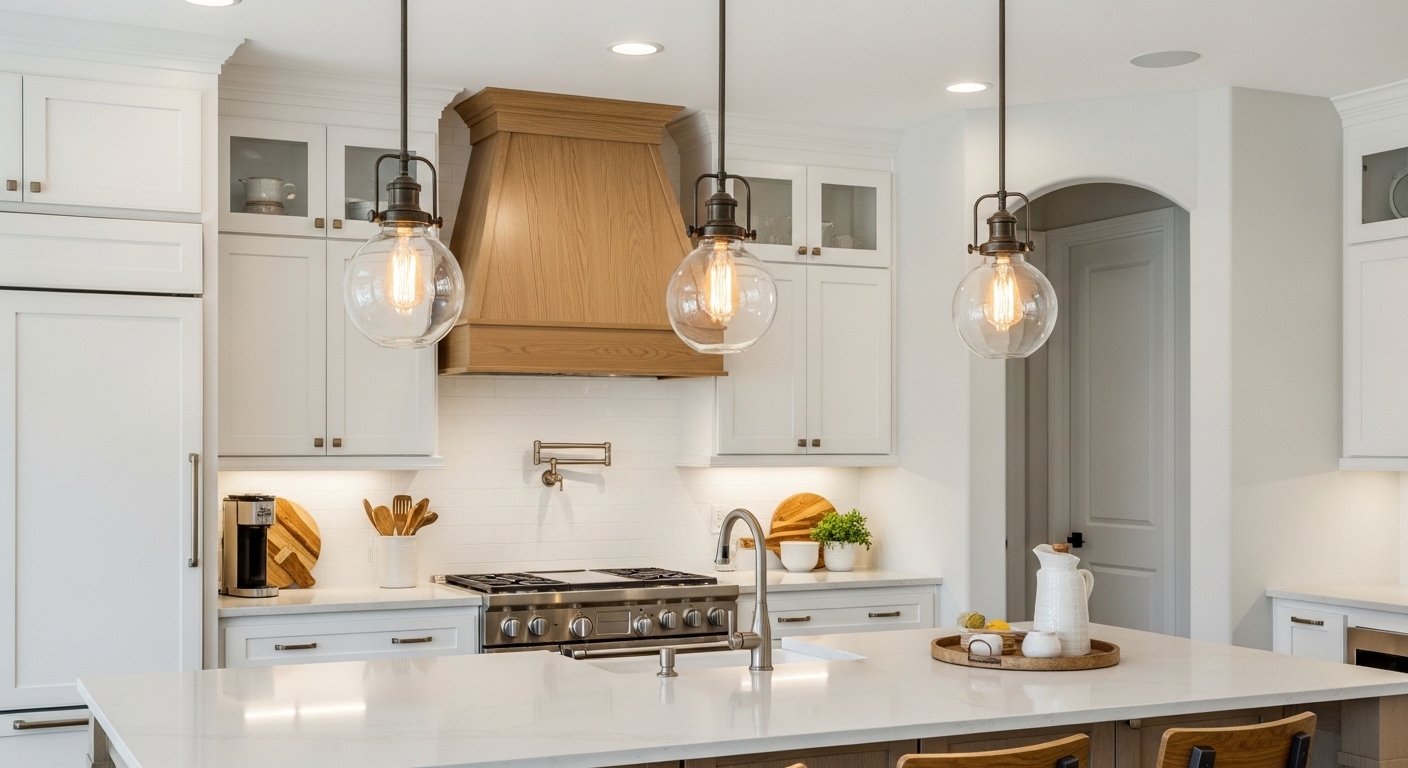
Three pendants over a 6-foot island was immediately right. The distribution matches the length of the island, each pendant relates to roughly a third of the surface below it, and the spacing creates a rhythm. I should have trusted the rule from the beginning.
Spacing: 30 to 36 Inches Between Pendants
Space pendant lights 30 to 36 inches apart, center to center. For a 6-foot island with three pendants, my spacing worked out to: 12 inches from the island's edge to the first pendant center, 30 inches to the middle pendant, 30 inches to the third pendant, 12 inches to the far edge. This keeps the outer pendants from overhanging the edge of the island, which you want to avoid for both aesthetic and practical reasons (someone will bump their head).
The 30-inch spacing was comfortable for our 8-inch-diameter pendants. If your pendants are wider, 12 to 14 inches, space them at 36 inches to keep visual breathing room between fixtures. The rule of thumb I use: the gap between pendant edges should be at least as wide as one pendant diameter. So 8-inch pendants need at least 8 inches of clear space between them, making 30-inch center-to-center spacing the minimum.
Hanging Height: 30 to 36 Inches Above the Countertop
Hang the bottom of the pendant 30 to 36 inches above the countertop surface. This range exists because sightlines vary: if you're using the island primarily for prep work, you want the pendants higher (36 inches) so they don't interrupt the view across the island when you're standing. If the island doubles as a dining surface with bar stools, you can hang lower (30 to 32 inches). The pendants read more like a low-hanging dining fixture at that point.
Our island is used for both prep and casual eating, so I landed at 32 inches above the counter. In practice, with a 9-foot ceiling and the countertop at standard 36-inch height, the cord length needed is: 108 inches (ceiling) minus 36 inches (counter height) minus 32 inches (desired distance from counter to pendant bottom) = 40 inches of cord from the ceiling to the fixture bottom. Each pendant came with an adjustable cord up to 60 inches, so this was easy to dial in.
This is where the ceiling height matters: for 9-foot ceilings the standard formula works cleanly. For 10-foot ceilings, add 3 inches to the cord drop (bringing the pendant 3 inches lower to maintain the same visual relationship). For 8-foot ceilings, subtract 2 to 3 inches. I learned this by looking at pendants that had been installed at 9-foot rules in a 10-foot space. They looked oddly high, like they'd been installed on a lower ceiling and someone had stretched the cord to reach.
Why I Chose Brass Glass Pendants (And What I Ruled Out)
I considered three finishes: brass, matte black, and clear glass with chrome. Our kitchen has warm white cabinets, white quartz with subtle gray veining, and warm oak hardwood floors. The decision tree for finish was:
- Matte black: Would have looked sharp and modern, but felt too stark against our warm palette. Black hardware works better in our kitchen as the secondary accent (faucet, cabinet pulls) than as the lighting statement piece.
- Chrome/nickel: Felt too cold. With our warm white cabinets and oak floor, chrome reads as slightly clinical.
- Brass with glass: The warmth of the brass tied to the oak floor. The glass globes diffused the light without blocking it, important over a prep surface where you need decent task light, not just ambient glow.
I bought the Astrid glass pendant from BO-HA, three of them, at $78 each, for a total of $234. The Astrid has a clear glass globe with a brass socket cup and canopy. The globe is 8 inches in diameter, which hit my sizing target exactly (I wanted roughly 1 inch of diameter per foot of island length, so 6-foot island = 6 to 8-inch pendants).
The brass ages slightly in the kitchen environment. I can already see a slight deepening of tone in the socket area near the bulb warmth after six months. I find this appealing. It looks like it belongs. If you want a finish that stays perfectly consistent, matte black powder coat or chrome are more stable over time. The glass pendant collection at BO-HA shows several variants, clear, smoked, and frosted. That pair with different finishes and kitchen styles.
The Measuring Mistake I Made
My first pair of pendants were 10 inches in diameter. I bought them based on photos on a manufacturer website where they looked slim and proportional. When I hung them, they looked enormous, almost comical, over the island. The photos had been taken in a kitchen with a 10-foot island and 11-foot ceilings. Mine is 6-foot island and 9-foot ceilings. The relative scale was completely different.
The lesson I take from this: never buy pendants without calculating your specific measurements first. The formula, 1 inch of diameter per foot of island, is conservative and that's intentional. In a typical residential kitchen with moderate ceiling height, the combined visual weight of three properly sized pendants reads larger than any single fixture would. Size down from what you think you want. You can always add visual weight through finish choice (brass reads heavier than chrome) or shade shape (a dome reads heavier than a globe), but you can't make an overscaled fixture look smaller.
Total Cost and What I'd Do Differently
Here's the full cost of our kitchen island lighting update:
| Item | Cost |
|---|---|
| 3 × Astrid glass pendants (BO-HA) | $234 |
| First attempt (wrong size, returned, $0 net) | $0 |
| Canopy covers for existing junction boxes | $0 (included with pendants) |
| 3 × E26 warm white bulbs (2700K, 800 lm) | $14 |
| Total | $248 |
I was able to stay under $250 because the previous owners had left junction boxes at three ceiling locations over the island. I just had to rehang fixtures, no electrician needed. If you need new junction boxes run, add $120 to $180 for an electrician hour. Still a very reasonable update for the impact it has on the kitchen.
What I'd do differently: I'd spend less time second-guessing the quantity (trust the formula, three over six feet is right) and more time confirming the exact cord length needed before ordering. Each Astrid came with 60 inches of adjustable cord, which was plenty, but I'd had visions of needing specific lengths and buying different pendants to accommodate them. Adjustable cord is the right thing to look for and most well-designed pendants offer it.
For more on the brass vs black finish decision, which I touched on briefly here. I go into much more depth in my post on brass vs matte black lighting throughout the house. If you're starting from the beginning on kitchen layout and lighting, the entryway pendant principles in my entryway lighting formula post apply directly to kitchen pendant sizing. And if the bedroom question is still on your list, my post on wall sconces vs ceiling lights covers the layered lighting principles that work in every room.
Shop This Post
Michelle at The Wharton House wrote a detailed guide on pendant light height over a kitchen island. The math section is the most useful thing I've found on this question.
Quick Answers
Q: How low should pendant lights hang over a kitchen island?
Hang pendant lights 30 to 36 inches above the countertop surface. At 30 inches the pendants feel closer and more intimate, good for islands that double as dining surfaces. At 36 inches the pendants stay above sightlines and feel less obstructive for prep work. For a 9-foot ceiling with standard 36-inch counter height, this means a cord drop of roughly 36 to 42 inches from the ceiling canopy to the bottom of the fixture.
Q: How many pendants do I need over a 6-foot kitchen island?
Three pendants over a 6-foot island. The rule is one pendant per two feet of island length. Space them 30 inches center-to-center, with the outer pendants 12 inches from the island edges. Two pendants over a 6-foot island looks like one is missing. The asymmetry with the long island reads as unintentional.
Q: What size should kitchen island pendants be?
Target 1 inch of pendant diameter per foot of island length. For a 6-foot island, aim for 6 to 8-inch diameter pendants. This seems small relative to catalog photos, but grouped pendants create combined visual weight, size down from instinct, since oversized pendants are the most common kitchen lighting mistake.